Deck Basics:
Building Simple Deck Handrails
With 2×4 Treated Lumber
Skill Level:
3+ (Moderate Skill)
Time Taken:
About 3 days, not including painting.
Start:
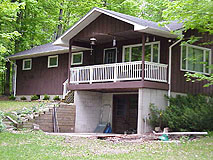
This mid-1970’s house has a walk-out basement with a deck above. But the deck needed handrails. It’s an eight-foot drop to the concrete below the deck, which sounds a bit dangerous.

Two views of the house without handrails.
I thought it looked kind of bare… like a face without a nose.


This corner support post was not positioned the same as the other corner… the base of this post was moved out flush with the face of the deck and secured with a block of wood.
I removed the block and hammered the post back into the proper (and plumb) position.
The deck steps looked newer than the deck. These were built incorrectly… the treads (the boards you walk on) are supposed to protrude about one inch beyond the riser (the vertical boards your toes kick).


The framing below the deck. The joists are 2×10’s spaced about 24 inches on center.
I made a quick CAD drawing of this handrail design to help me keep track of dimensions. Maybe this will be useful to some readers. The blue lines represent the intermediate posts. I don’t show all of the spindles in the frontal view.

Getting Started:
I began this project in my workshop. I made initial measurements of the spacing between the deck posts, and then I pre-assembled sections of handrail about a half-inch longer than the measured dimensions.
Why make the sections longer? Experience tells me that 1) Nothing Ever Goes As Planned, and 2) it’s much easier to cut a board shorter than to correct a board that is too short.
Besides, the deck posts were badly warped and twisted, rather out-of-plumb, and just not very precise. The way I deal with such lack of precision is to make the pre-assembled sections a little extra long and trim them to length prior to installation.
Also, before starting I gave all pieces of wood a quick sanding with a random orbital sander. The instructions on the stain I used insist on removing the “mill scale” with a light sanding. This took about half an hour.
Installing the first section (near the top of the picture) was easy because it was a simple run between the corner post and the post nailed to the wall (not visible in this picture).
The other sections were more challenging because they had to be connected to intermediate posts.


This is one of two posts that I cut and primed in my shop. The notch is easy to cut with a circular saw. Cutting this notch in a similar post can be seen in this article.
I inserted the post (red arrow) into the hole in the deck.
That diagonal piece of wood was necessary to straighten the outer pair of joists, which had warped over the years. Without straightening, the post would lean badly.

A Common Problem:
The diagonal block of wood is basically half of the old-fashioned cross-bracing between joists. Cross bracing can be a pain to cut because of the odd angles. It’s more common (and easier) to use solid wood blocking made from the same material as the joists (2×10 in this case), but I didn’t have any large lumber with me, and it’s too far into town to justify driving to a lumberyard.
To force the double 2×10 outer joist into a plumb position, I wedged a long 2×4 between the joist and the concrete slab below, and hammered the base of the 2×4 until the post was plumb. Ah… the joys of working with wood… nothing’s ever straight.
One cheap and quick solution is to shim the post where it attaches to the joists, but this would not solve the problem of the joists being too flexible, and the entire railing would feel flimsy.

I used a Quick Grip clamp as a “stop block” to hold the section of railing in position. This also kept the railing from falling off the deck.
The first connection I made was between the railing and the post.
At the top I pre-drilled a hole and drove a 3″ deck screw into the post.


On the lower horizontal 2×4 I drove two deck screws into the post.
At this point the left end of the railing is loosely held to the corner post, and the white post is only clamped to the joist.
Note how the railing is resting on blocks of wood (with a shim to help make the section level).
Note that the face of the horizontal 2×4 is set back about 5/16″ from the face of the post. This setback makes the railing assembly centered relative to the post.
With the railing attached to the intermediate post, I attached the other end to the corner post, using the same method as the above two pictures. Of course, I made sure the railing was level and plumb before I attached it.
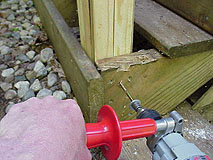
Holding the intermediate post plumb, I attached it to the joists with 4½ inch Simpson Strong-Drive lag screws. These require a heavy-duty drill with a 3/8″ hex driver bit. Ordinary lag screws would work fine, but they require more time.
Note the big washers. I always use large washers to spread the clamping force over a larger area. Without washers the screw heads tend to sink in and crush the wood fibers, which (I believe) causes the posts to loosen over time.

Also note the pieces of OSB behind the post. I needed these because I made a mistake in measuring and cut the post notches too deep. This is one drawback of working away from the job site… it’s harder to check your measurements.
To recap my railing installation approach:
- I measured the distance from the corner post to the end of the first railing section.
- I marked the post location on the deck boards, by tracing a scrap of 4×4.
- I cut the deck boards with a Sawzall, making the hole a little bigger than the post.
- I inserted the pre-cut intermediate deck post and held it loosely in place with Quick-Grip clamps.
- I placed the section of handrail on 3″ support blocks and secured the railing to the loosely-clamped intermediate post.
- I adjusted the railing to be level and plumb.
- I attached the other end of the railing to the corner post (or to the previously installed intermediate post).
- Holding the new intermediate post plumb, I bolted it securely with lag screws.
Keep in mind that there are many ways to install handrails… this is just one method that works well with pre-assembled sections of railing.

I installed the third and fourth sections of handrail in the same manner.
The connection between the railings and the intermediate posts. I also installed a screw in the underside of these top horizontal boards.


The lower connections are not my favorite approach, because I’m not too crazy about visible fasteners, but this railing is a more economical approach.
One alternative is to install metal angle clips to the underside of the bottom rail, and screw these to the posts.
After the handrail sections were installed I ran the belt sander over the top to smooth out any protruding spindles or other high spots. This tool (Sears Craftsman, about $160) is worth it’s weight in gold.


I installed the top cap with 3″ deck screws. Since the total length of this front railing was 17′-5″, I had to use two sections of top rail. I bevel-cut the first section, which makes for a stronger and tighter joint.
The second piece of top cap was also bevel-cut to fit against the first piece. The junction is barely visible.

Note in the picture above that there is a slight “chamfer” or angled edge to the corners of the top cap. I made this with the belt sander, and it took only a few minutes. This reduces splinters and looks a bit nicer than the rounded edge that comes with the lumber. Besides, the rounded corners are not always the same radius on different boards, and this is a way to avoid that minor problem.

For no reason other than general laziness, I chose to build the stair railing and the short flat railing at the site.
The first step was to mark the location of the upper post and cut the hole in the deck boards. The upper post was set to its final height, but the lower post was left too long.
These deck posts did not need to be notched like the other posts.
To install the lower post, I removed part of a stair tread.
I held the post in place with clamps and shimmed it plumb.


I measured the “Nose Angle”, or angle that is formed by the edges of all the stair treads.
I laid a 4-foot level against the steps, then placed a 12-inch speed square on the angled level. Using a shorter level (held perfectly horizontal) I read the angle on the speed square.
The nose angle was 34 degrees above horizontal.
Marking The Cut On The Lower Post:
I laid a long 2×4 on top of the upper post, and clamped it to the lower post, guessing about the angle.


Closer pictures of that.

Using a speed square and a 2-foot level, I measured the angle of the board. I moved the board until I got the angle correct.
This is much easier to do with a helper holding and adjusting the lower end of the board.


When I had the board at the correct angle I marked the line where the underside of the board intersected the post.
This represents the top edge of the upper rail, and the underside of the cap.
I cut the top of the post on a miter saw and then fastened the post to the stair stringers, using 4½ inch lag screws.

To measure the upper rail, I first screwed a long 2×4 to the top of the lower post. This acts as a temporary top cap, to help in measuring the rail beneath it.
Using a miter saw I cut the angle on the lower end of the rail. In this case it was 34 degrees away from a normal square cross-cut.
Then I placed the lower end of the rail against the lower post and held the rail in place with a clamp.
I marked the line where the face of the upper post intersected the rail.
This cut was not exactly the 34 degree angle I expected (of course)… because… it’s wood… everything is warped and twisted.


I cut the upper rail to length and installed it with 3 inch deck screws.
One advantage of this technique is that it tends to make the rail a tiny bit too long after the first cut. (If you understand the geometry of triangles you’ll understand why…you are getting the hypotenuse of a long skinny right triangle, when you want the long side)
But this just means that I have to make an extra cut to make the rail to fit less tightly. I prefer it this way.
I installed the top caps over the rails.
I screwed the spindles into place.
I cut a pair of spacer blocks (red arrow) and held them in place by just pushing on the spindle.

The spindles on the short horizontal railing had been pre-cut in my shop. I intentionally left several spindles extra-long, knowing that the sloping handrails would need longer spindles.

For the sloping handrails, I first determined the location of the upper-most spindle, then I cut the spindle to length. This meant that the top had to be cut on an angle on the miter saw. Again, this angled cut was 34 degrees from a normal square cut.
Once the first spindle was cut and checked, I cut the remaining spindles to the same length. To install the spindles I held spacer blocks (one upper and one lower) in place with clamps while driving in 2½ inch deck screws.
The completed railing.


I used the belt sander to chamfer the edges of the top cap, and to clip off the protruding tip of the angled top cap.
Note: In some areas building codes require a “graspable” railing on stairs, so this 2×4 top cap may not be acceptable by itself. I have seen projects where the builder had to install a narrower piece of wood on top of a railing like this. Ask your local Building Department for a list of suitable materials that meet this “graspable” requirement.
After all the carpentry was completed I finished the railings in the following manner:
- I spot-primed all the knots with Zinsser’s BIN Sealer, which helps prevent the sap from bleeding through the finish.
- I primed the wood with Zinsser’s Cover Stain oil-based primer.
- I coated the wood with Rubbol DEK solid tone stain by Sikkens. This is an excellent oil-based coating that appears to be the same as paint, but has less tendency to peel. It is supposed to wear away slowly without peeling. The primary benefit is that 5 to 10 years later when it’s time to repaint, scraping loose paint and re-priming won’t be necessary. All it needs is a power-washing and single recoating. This product isn’t cheap (about $40 a gallon) but it performs well. I used about half a gallon on this railing.
The Completed Project:
I think the house looks better with railings.

The house has brown-stained rough-sawn T1-11 plywood siding, which gives it a rustic appearance that is hard to capture in pictures.
Railings add a small amount of privacy to a deck or porch… plus a feeling of security!


In these pictures the railing seems to have a sleek contemporary appearance, but the small photos can be deceiving.
Much of the rough wood texture shows through the solid-tone stain, although the pictures don’t capture the texture very well.

In some pieces of wood the grain is distinctly visible through the coating, because the smooth-planed lumber shrank after milling, leaving bands of high and low material.
The material costs for this railing, about 29 lineal feet, was around $120, not including the paint. While this railing was built with ordinary pressure-treated Southern Yellow Pine lumber, a smoother appearance can be obtained with various types of cedar.
Also read: How Much Does It Cost To Remodel A Bathroom In New York and Maintain Your Deck .
If you need more professional deck service please contact Area Renovation Inc for a free offer.